Why Oreo Delight A Dreamy No-Bake Dessert Wins Hearts
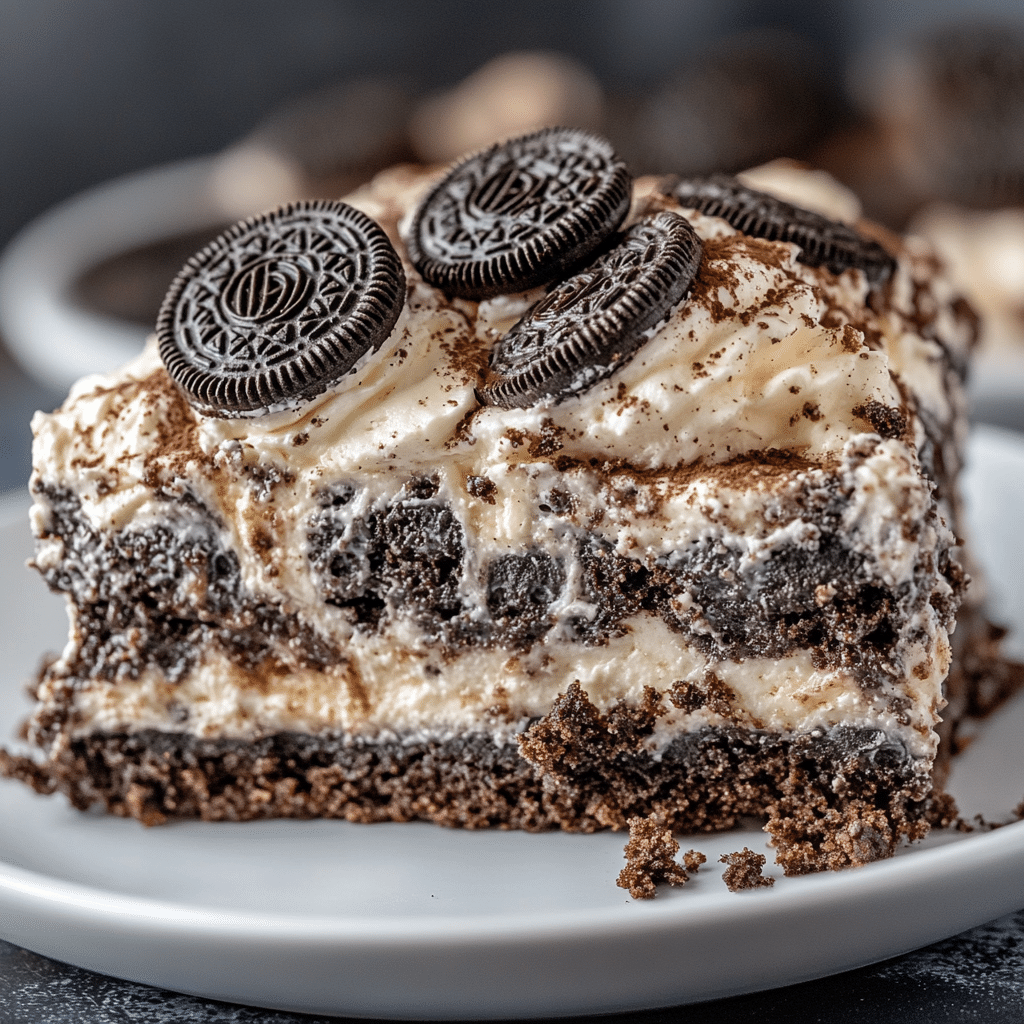
Discover the irresistible Oreo Delight A Dreamy No-Bake Dessert recipe that’s easy, creamy, and perfect for any sweet craving! This luscious treat combines crunchy Oreo cookies with rich cream cheese and whipped topping, creating a harmonious blend of textures and flavors that’s guaranteed to win hearts at any gathering or quiet night in. Simple to prepare without turning on the oven, this dessert is a no-fuss way to satisfy your sweet tooth while impressing friends and family with little effort.
Why You’ll Love This Recipe
- Effortless Preparation: With no baking required, this recipe is perfect for busy days or last-minute dessert needs.
- Creamy and Crunchy Texture: The smooth, velvety filling paired with crunchy Oreo pieces creates a delightful mouthfeel.
- Versatile and Customizable: It’s easy to tweak to suit dietary preferences or personal taste with simple ingredient swaps.
- Family-Friendly Flavor: A crowd-pleaser that both kids and adults adore for its nostalgic and indulgent taste.
- No Special Equipment Needed: Just basic kitchen tools—making it accessible for any home cook, regardless of experience.
Ingredients You’ll Need
The beauty of the Oreo Delight A Dreamy No-Bake Dessert lies in its simple, everyday ingredients that work harmoniously to create a standout treat. Each plays a vital role in delivering the ideal balance of sweetness, texture, and richness.
- Oreo Cookies: Use whole or crushed Oreos for that signature chocolaty crunch in every bite.
- Cream Cheese: Adds creamy texture and a slight tang that complements the sweetness.
- Whipped Topping: Provides lightness and airy consistency, making the dessert fluffy and smooth.
- Sweetened Condensed Milk: Brings concentrated sweetness and a silky finish.
- Vanilla Extract: Enhances the overall flavor profile with a warm, inviting aroma.
- Butter: Helps bind the crust together and adds richness.
Variations for Oreo Delight A Dreamy No-Bake Dessert
This dessert is incredibly adaptable, giving you room to experiment and make it uniquely yours based on the ingredients you have at home or your dietary preferences. Here are some inspiring twists you might enjoy.
- Chocolate Lovers’ Dream: Add a drizzle of melted chocolate or cocoa powder to intensify the chocolate flavor.
- Nutty Touch: Mix in crushed nuts like pecans or almonds for an added crunch and nutty aroma.
- Dairy-Free Twist: Substitute cream cheese and whipped topping with coconut cream alternatives for a vegan version.
- Fruit Infused: Add a layer of fresh strawberries or raspberries for a burst of freshness and color contrast.
- Mini Oreo Bites: Shape the dessert into bite-sized portions for parties or kid-friendly snacks.

How to Make Oreo Delight A Dreamy No-Bake Dessert
Step 1: Prepare the Oreo Crust
Start by crushing the Oreo cookies finely, then combine them with melted butter to form a crumbly, moist mixture. Press this mixture evenly into the base of your pan to create the solid foundation that will hold the creamy layers.
Step 2: Mix the Creamy Filling
In a large bowl, beat the cream cheese until smooth and creamy, then gradually add sweetened condensed milk and vanilla extract. Gently fold in the whipped topping to maintain its fluffy texture.
Step 3: Incorporate Oreo Pieces
Fold some chopped Oreo pieces into the filling mixture, ensuring they’re distributed evenly but without overmixing to preserve distinct cookie bites.
Step 4: Layer and Chill
Spread the creamy filling over the prepared crust, smoothing the top with a spatula. Cover the dessert and refrigerate for at least four hours or overnight to let it set perfectly.
Step 5: Garnish and Serve
Before serving, sprinkle additional crushed Oreos or chocolate shavings over the top for eye appeal and extra crunch.
Pro Tips for Making Oreo Delight A Dreamy No-Bake Dessert
- Proper Chilling Time: Ensure the dessert chills for a minimum of 4 hours for the best texture and sliceability.
- Room Temperature Ingredients: Soften cream cheese before mixing to avoid lumps in your filling.
- Handle Oreos Gently: Chop Oreos by hand for chunkier pieces that provide enjoyable contrast in texture.
- Use a Springform Pan: Makes slicing and serving easier without damaging the dessert’s structure.
- Don’t Skip the Butter in Crust: This helps the crust hold together well and adds depth to the flavor.
How to Serve Oreo Delight A Dreamy No-Bake Dessert
Garnishes
Bring your dessert to life by topping it with extra crushed Oreos, a drizzle of chocolate sauce, or even a dollop of whipped cream for added charm and flavor layers.
Side Dishes
Pair the Oreo Delight with fresh fruit like strawberries or a scoop of vanilla ice cream to balance the richness and enhance the dessert experience.
Creative Ways to Present
Serve this treat in individual parfait glasses layered with crushed Oreos and filling for a stunning presentation that’s perfect for parties or elegant dinners.
Make Ahead and Storage
Storing Leftovers
Keep any leftovers covered in the refrigerator, ideally in an airtight container, where they can stay fresh for up to 3-4 days without losing their creamy texture.
Freezing
This dessert freezes well for up to one month; wrap it tightly in plastic wrap and foil to prevent freezer burn, then thaw in the refrigerator overnight before serving.
Reheating
Since it’s a chilled dessert, just let it sit at room temperature for 15-20 minutes after refrigeration or thawing to soften slightly before serving—no reheating needed.
FAQs
Can I make Oreo Delight A Dreamy No-Bake Dessert gluten-free?
Yes! Simply swap regular Oreos for gluten-free Oreo-style cookies, and ensure all other ingredients are gluten-free certified.
How long does the Oreo Delight need to chill?
For the best set and texture, chill the dessert for at least 4 hours, though overnight chilling is ideal.
Can this dessert be made dairy-free?
Absolutely! Replace cream cheese and whipped topping with dairy-free alternatives like vegan cream cheese and coconut whipped cream.
What’s the best type of pan to use for this dessert?
A springform pan is highly recommended for easy removal and neat slices but an 8×8-inch square pan also works well.
Can I add other flavors to the filling?
Yes, adding extracts like mint or almond, or even mixing in peanut butter or caramel, can create delicious variations tailored to your taste.
Final Thoughts
Oreo Delight A Dreamy No-Bake Dessert is one of those magical recipes that feels like a special treat yet is incredibly simple to whip up. Its unbeatable combination of creamy texture and Oreo crunch makes it a must-try for anyone who loves convenient desserts with maximum flavor. So go ahead, dive into this dreamy delight, and share the joy with those you love!
Related Posts
- How to Make Homemade Vanilla Ice Cream Easily
- Why Byron Bay Chocolate Chip Cookies Taste Amazing
- Why Best Peach Dump Cake Wins Every Time
Oreo Delight A Dreamy No-Bake Dessert

Oreo Delight A Dreamy No-Bake Dessert is a creamy, crunchy, and effortless treat combining Oreo cookies, cream cheese, whipped topping, and sweetened condensed milk. Perfect for any occasion, this no-bake dessert delivers rich flavor and texture with minimal preparation and no oven required.
- Prep Time: 15 minutes
- Cook Time: 0 minutes
- Total Time: 4 hours 15 minutes
- Yield: 8-10 servings 1x
- Category: Dessert
- Method: No-Bake
- Cuisine: American
- Diet: Gluten Free (with gluten-free Oreo substitute)
Ingredients
For the Crust
- 24 Oreo Cookies (whole or crushed)
- 5 tablespoons Butter (melted)
For the Filling
- 16 oz Cream Cheese (softened)
- 1 can (14 oz) Sweetened Condensed Milk
- 1 teaspoon Vanilla Extract
- 1 cup Whipped Topping
- 6 Oreo Cookies (chopped for folding into filling)
Instructions
- Prepare the Oreo Crust: Start by crushing the Oreo cookies finely, then combine them with melted butter to form a crumbly, moist mixture. Press this mixture evenly into the base of your pan to create the solid foundation that will hold the creamy layers.
- Mix the Creamy Filling: In a large bowl, beat the cream cheese until smooth and creamy, then gradually add sweetened condensed milk and vanilla extract. Gently fold in the whipped topping to maintain its fluffy texture.
- Incorporate Oreo Pieces: Fold some chopped Oreo pieces into the filling mixture, ensuring they’re distributed evenly but without overmixing to preserve distinct cookie bites.
- Layer and Chill: Spread the creamy filling over the prepared crust, smoothing the top with a spatula. Cover the dessert and refrigerate for at least four hours or overnight to let it set perfectly.
- Garnish and Serve: Before serving, sprinkle additional crushed Oreos or chocolate shavings over the top for eye appeal and extra crunch.
Notes
- Ensure the dessert chills for a minimum of 4 hours for the best texture and sliceability.
- Soften cream cheese before mixing to avoid lumps in your filling.
- Chop Oreos by hand for chunkier pieces that provide enjoyable contrast in texture.
- Use a springform pan for easier slicing and serving without damaging the dessert’s structure.
- Don’t skip the butter in crust to help it hold together well and add depth of flavor.
Nutrition
- Serving Size: 1 slice (approx. 1/10 of recipe)
- Calories: 350
- Sugar: 30g
- Sodium: 210mg
- Fat: 22g
- Saturated Fat: 12g
- Unsaturated Fat: 8g
- Trans Fat: 0g
- Carbohydrates: 34g
- Fiber: 1g
- Protein: 5g
- Cholesterol: 50mg
Keywords: Oreo dessert, no-bake dessert, easy dessert, creamy dessert, Oreo cheesecake, no bake Oreo, family-friendly dessert